Apple Pay
Apple Pay is a mobile payment and digital wallet service by Apple Inc. that allows users to make payments in person, in iOS apps, and on the web using Safari. It is supported on the iPhone, Apple Watch, iPad, and Mac.
Supported Markets
Supported merchant countries
Merchants domiciled in the following countries can accept Apple Pay.
Supported shoppers countries and issuers
Shoppers whose issuing banks are located on this list are eligible to purchase with Apple Pay.
Apple Pay on the Web

Apple Pay is not supported when using an iframe.
This section covers how to configure Apple Pay for payment on your website, using our CheckoutSDK.
To begin accepting payment with Apple Pay, you need to:
You can skip these steps if using our wordpress plugin.
Register your domain
To use Apple Pay on the web, you need to register the top-level domain or subdomain where you will display the Apple Pay button. You can do so by filling out this form.
Host the domain verification file
Our team will process your request, and send you a uniuqe domain-verification file by email. Host the domain-verification file at:
https://[YOUR_DOMAIN]/.well-known/apple-developer-merchantid-domain-association
Setup Wallet
Required for Custom Checkout Integration only
In order to create a merchant session object, Setup Wallet API has to be used
Sandbox merchantIdentifier: merchant.co.whenthen.applepay
Production merchantIdentifier: merchant.com.whenthen.applepay
Client Side SDK Implementation
Display the Apple Pay button on your checkout by adding applepay to thealternativePaymentMethods option.
const option = {
	alternativePaymentMethods: [
		{
		type: "applepay",
		option: {
				paymentRequest: {...} // ApplePayPaymentRequest
		}
	]
}
Options
paymentRequestApplePayPaymentRequest ﹡A request for payment, which includes information about payment processing capabilities, the payment amount, and shipping information. for more details.
See ApplePayPaymentRequest for all available options.
See Apple Pay Payment Request for default value.
See Apple Pay Payment Request Sample for paymentRequest sample code.
Apple Pay Payment Request
const applePayDefaultOption = {
  merchantCapabilities: ['supports3DS'],
  supportedNetworks: [
    'visa',
    'masterCard',
    'amex',
    'discover',
    'jcb',
    'interac',
    'maestro',
    'electron',
    'cartesBancaires',
    'girocard',
  ],
};
Apple Pay Payment Request Sample
Specify value for merchantCapabilities and supportedNetworks to override the default values in Apple Pay Payment Request
{
  type: 'applepay',
  options: {
    paymentRequest: {
      countryCode: 'IE',
      currencyCode: 'EUR',
      total: {
        label: '** YOUR STORE NAME **',
        type: 'final',
        amount: '10.00',
      },
    },
  }
}
AuthorizeAlternativePaymentInput
Required for Elements integration when calling authorizeApplePayPaymentRequest
AuthorizeAlternativePaymentInput {
  flowId: string;
  currencyCode: string;
  amount: number;
  orderId?: string;
  intentId?: string;
  perform3DSecure?: {
    redirectUrl: string;
  };
}
Elements
Apple Pay requires authorize payment api call while the ApplePay authentication dialog is active. If using element integrations, onPaymentRequest callback will return the payment method applepay and you have to handle applepay using the authorizeApplePayPaymentRequest method provided by the sdk to create a payment.
AuthorizeAlternativePaymentInput is required when calling authorizeApplePayPaymentRequest
window.addEventListener('load', async () => {
const checkoutSdk = await WhenThenSdkLoader.loadCheckoutSdkElement('#container', options);

const authorizeApplePay = async () => {
    try {
        const result = await checkoutSdk.authorizeApplePayPaymentRequest({
          flowId: "** YOUR_FLOW_ID **",
          currencyCode: "EUR" // ISO 4217 format
          amount: 1000 // Long
        });
        // complete your integration using authorizePayment result
    } catch (e){
        // handle error
    }
}

checkoutSdk.on('paymentRequest', ({ paymentMethod }) => {
    switch(paymentMethod) {
        case "applepay":
          authorizeApplePay();
        break;
        ...
    }
    });
});
React Integration
const authorizeApplePay = async () => {
try {
    const result = await sdkRef.current.authorizeApplePayPaymentRequest({
       flowId: "** YOUR_FLOW_ID **",
       currencyCode: "EUR" // ISO 4217 format
       amount: 1000 // Long
    });
    // complete your integration using authorizePayment result
} catch (e){
    // handle error
}
}

const handlePaymentRequest = ({paymentMethod}: CheckoutPaymentRequestEventDetails) => {
switch(paymentMethod) {
    case "applepay":
       authorizeApplePay();
    break;
    ...
}
}
Drop-in
No additional configuration required for drop-in integration, onPaymentComplete callback will receive the result from authorize payment api call. See Drop-in integration for more information.
Apple Pay on iOS
Setup Apple Pay
To setup Apple Pay on a native iOS app, please follow the official Apple Pay setup guide. You can also download our ApplePay reference app to test your integration.
Generate Payment Processing Certificate
Contact our support team (support@whenthen.com) to request for a Certificate signing request file
Log into to your Apple Developer Account and go the Certificates, Identifiers & Profiles section. In the create a new certificate view, select "Apple Pay Payment Processing Certificate".
Select the merchantId that you want the certificate associated with.
On the next page, click the “Create Certificate” button.
On the Create A New Certificate page, click "Choose File", select the CSR file provided to you by WhenThen, and click Generate.
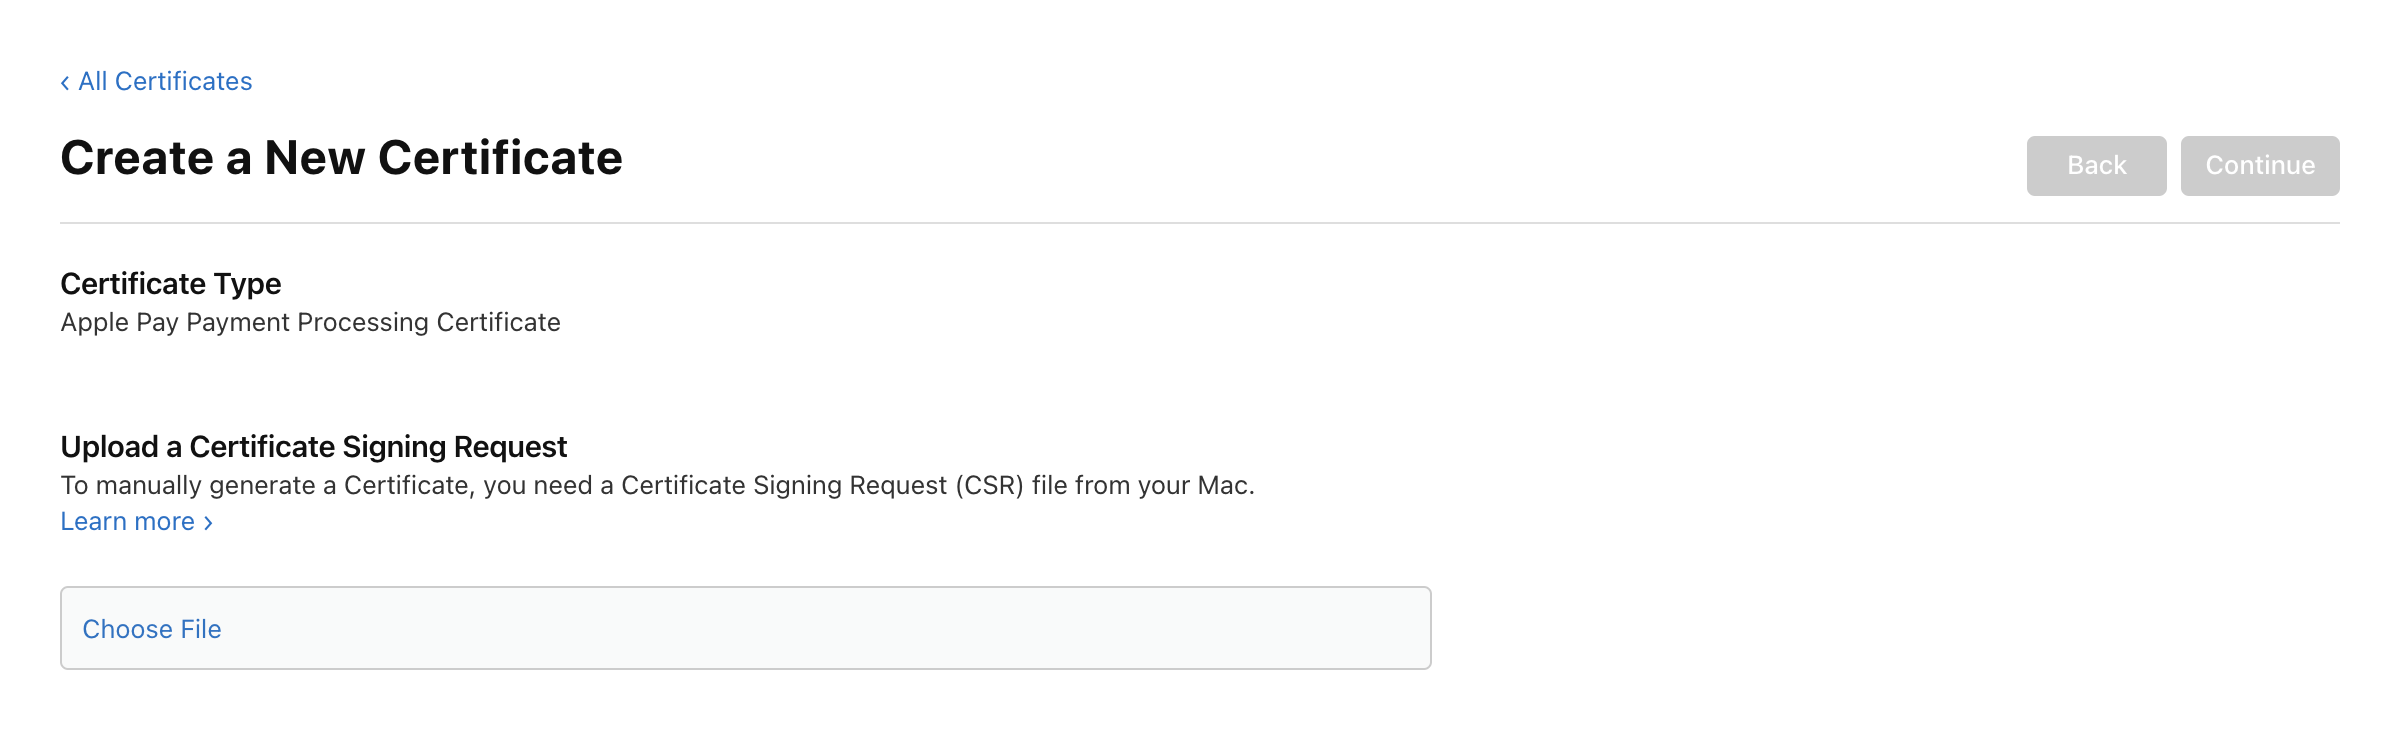
Download the certificate by clicking "Download", and click "Done".
Send the certificate to us by email to support@whenthen.com.
We will inform you when the certificate is ready to be used with your integration.
Process Payment
After obtaining a payment network token from Apple Pay through PKPaymentAuthorizationViewController object, you can then use this to call the Create Payment API setting the paymentMethod as APPLE_PAY and passing the network token in the walletToken field. Please ensure the parent level object of the token is paymentData{}.
We recommend using Apollo GraphQL library for making the request.
Request
curl
-X POST
-H "Content-Type: application/json"
-H "Authorization: Bearer xxxxxxx"
-d '{
	"query": "mutation authorizePayment($authorisePayment: AuthorisedPaymentInput!) {
    authorizePayment(authorisePayment: $authorisePayment) {
       id
       status
    }
  }",
  "variables": {
    "authorisePayment":{
      "orderId":"557512fb-e5f3-45ce-9e60-b9418b92153b",
      "flowId":"2d0fc623-f1ca-4051-b60a-7366ca14783c",
      "amount":100,
      "currencyCode":"*** ISO 4217 Curency Code ***",
      "paymentMethod":{
         "type":"APPLE_PAY",
         "walletToken":"*** APPLE_PAY_TOKEN as JSON String ***",
      },
      "customer":{
         "id":"uuid (optional)"
      }
    }
  }
}'
https://api.whenthen.com/api/graphql
Response
Lastly, to inform your app about the outcome of the payment, you need to map WhenThen’s payment response status with PKPaymentAuthorizationStatus to meet your application requirements.